Select Item Load

Overview
The Select Item Load screen allows users to Import Items from the Meaningful Selections application (a separate Batesville application outside of MIS Professional). Meaningful Selections is a robust online virtual showroom that displays Batesville items online. It also allows funeral home employees to set pricing on the items and export them to be used with the MIS Professional application. For more information on Meaningful Selections, please contact customer support.
If MIS Professional has been setup to integrate with Meaningful Selections, the Select Item Load screen will be accessible and can be accessed from the Menu bar by navigating to Administration - Select Item Load.
The Select Item Load screen Imports the json file that is generated from Meaningful Selections, Processes that file and when successful – populates the MIS Professional Item master table with all available items from Meaningful Selections, for use in Contract entry with the MIS Professional application.
Please note that the Select Item Load option on the Administration menu will be grayed out by default, access must be given to this screen.
Workflow
In order to Import the Meaningful Selection item file, you first need to create the file from Meaningful Selections.
Creating the Export file in Meaningful Selections:
- Log into Meaningful Selections using an account that has Admin rights
- Go to the Admin Panel
- Setup Pricing for any/all items desired
- If needed, set Additional Offering items up as well
- From the Pricing Tool view, click on the ‘Update Pro Item Master’ button. This will generate a json export file that contains all of the items the Select user has access to.
- Save the export file to your desktop, ensure that it has a file extension of .json (enter this if not defaulting)
- Close out of all Meaningful Selection windows
- Continue on to the next step in MIS Professional
Importing the file into MIS Professional:
- Log into MIS Professional
- Navigate to the Administration - Select Item Load screen
- Click on the ‘Upload Select Items’ button and browse and choose the JSON file that you saved previously.
- Click on the ‘Refresh’ button to refresh the screen and check the status.
- There are two tables used when we import a file from Selections to MIS Professional, the Product_Import_Hdr and the Product_Import_Dtl tables.
- Back in MIS Professional, Verify the Processed value = false.
- Highlight the row and click on the ‘Process Select Items’ button in the footer:
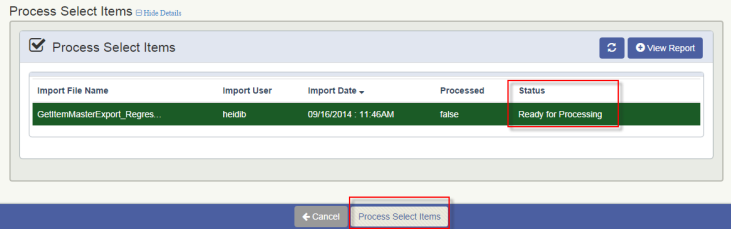
- When the Processed = ‘true’, check the Status.
Important Note: Even if the Status = Processed with Errors, ALL other items that ARE setup with the proper location codes and categories, etc WILL IMPORT. Only those items that were not setup correctly will not be imported. You can correct any errors that you want to correct, and then re-import the same file if desired. Newly sequenced rows will be added to the ‘Staging’ table for any updated items.
- If the process does complete with errors, click on the VIEW REPORT button to see where any problems may be.
Note: If the report does not appear, please check Setup
- There are two tables used when we import a file from Selections to MIS Professional, the Product_Import_Hdr and the Product_Import_Dtl tables
- Now that the Import has processed, check the Item master table and see that the items were added to it.